In this post, we will cover how to setup Bind Server on Ubuntu 24.04 LTS (Noble Numbat) step by step.
BIND is a robust and feature-rich DNS system that adheres to Internet Engineering Task Force (IETF) standards.
It is extensively deployed across the Internet, serving various purposes from hosting large zone files to providing recursive DNS resolution.
BIND allows users to publish DNS records under the server’s authoritative control. As an authoritative DNS server, it serves as the source of truth for specific DNS zones, providing information about domain names, IP addresses, and other DNS resource records.
In addition, BIND supports master-slave replication, allowing users to set up primary (master) and secondary (slave) DNS servers for redundancy and high availability.
The master server maintains the authoritative zone data, while the slave servers replicate this data for fault tolerance. The latest stable version of BIND is 9.18. Therefore, let’s start setting up the Bind DNS Server on Ubuntu 24.04.
Prerequisites
- Minimal Installed Ubuntu 24.04
- Sudo or root privileges
- Internet connectivity
Lab Setup
- Bind Server IP (Ubuntu 24.04) = 192.168.1.7
- Domain Name = linuxbuzz.net
- Private Network = 192.168.1.0/24
1) Install Bind Server on Ubuntu 24.04
First, update your system package repository:
$ sudo apt update
The Bind DNS package can be found in Ubuntu 24.04 default repositories. Run the following command to install the bind9 package and the necessary tools:
$ sudo apt install -y bind9 bind9utils bind9-doc dnsutils
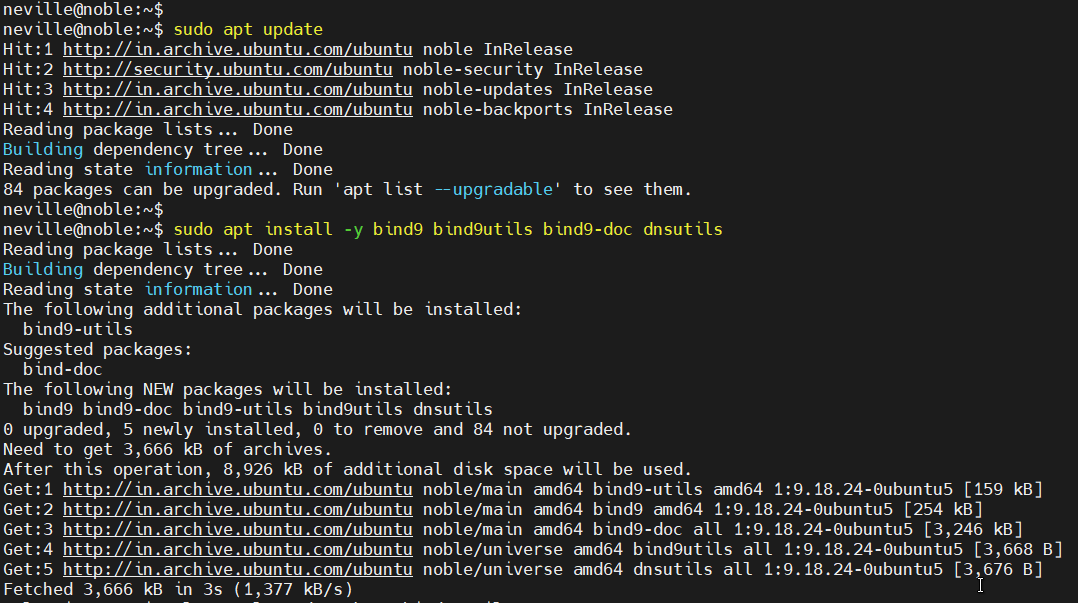
Next, start and enable the Bind 9 DNS service:
$ sudo systemctl start named
$ sudo systemctl enable named
To check the Bind 9 DNS status, run:
$ sudo systemctl status named

2) Setup Bind Server on Ubuntu 24.04
Once you have all the packages installed, we’ll move on to the configuration part. All the configuration files for BIND 9 are located in the folder “/etc/bind/named.conf.options“. From this file, we can set the following parameters:
- Allow query from private network: By specifying the allow-query directive, you can control which IP addresses and ranges are allowed to query your DNS server.
- Allow recursive queries: This option allows your DNS server to resolve queries by recursively querying other DNS servers)
- Forwarders: If your local DNS server is unable to resolve a query, you can forward it to other DNS servers (forwarders) using this option.
- Specify DNS port: You can set the port on which BIND listens for DNS requests using the listen-on and listen-on-v6 statements.
Now, edit the file and add the below parameters as shown below
$ sudo vi /etc/bind/named.conf.options
acl internal-network {
192.168.1.0/24;
};
options {
        directory "/var/cache/bind";
        allow-query { localhost; internal-network; };
        allow-transfer { localhost; };
        forwarders { 8.8.8.8; };
        recursion yes;
        listen-on-v6 { any; };
        dnssec-validation auto;
        listen-on-v6 { any; };
};
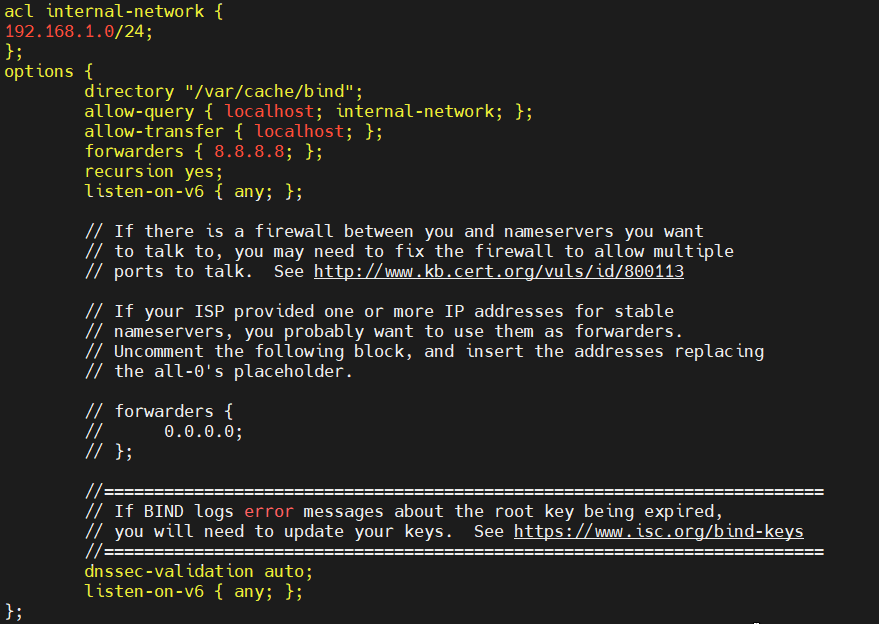
Once you’re done, save and exit the file. Next, modify the /etc/bind/named.conf.local file:
$ sudo vi /etc/bind/named.conf.local
Add the following lines:
zone "linuxbuzz.net" IN {
        type master;
        file "/etc/bind/forward.linuxbuzz.net";
        allow-update { none; };
};

zone "1.168.192.in-addr.arpa" IN {
        type master;
        file "/etc/bind/reverse.linuxbuzz.net";
        allow-update { none; };
};
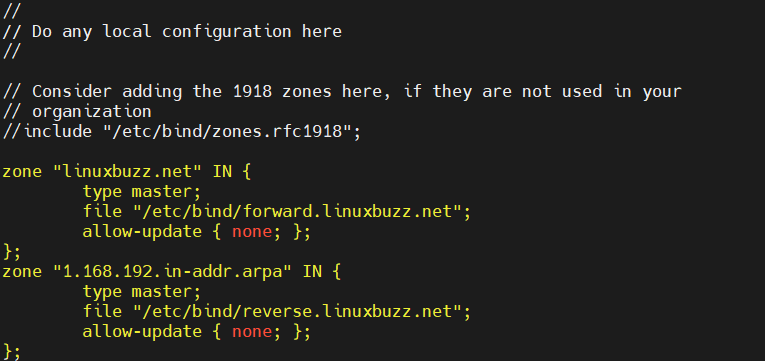
Save the changes and exit the file. The following explains what we’ve added to the configuration file above:
- linuxbuzz.net is your forward zone.
- 1.168.192.in-addr.arpa is your reverse zone.
- forward.linuxbuzz.net is your forward lookup zone file.
- reverse.linuxbuzz.net is your reverse lookup zone file.
To check for syntax errors in your configuration file, run:
$ sudo named-checkconf

If there is no output, it indicates we’ve correctly configured the files.
3) Configure the Zone Configuration Files
Both forward and reverse lookup zones require configuration files to be generated for your domain to function properly.
The forward lookup zones handle domain-to-IP translation, while the reverse lookup zones handle IP-to-domain translation.
Both are essential for a well-functioning BIND DNS infrastructure. To get started, run the following command to access the bind directory:
$ cd /etc/bind/
Next, run the following commands to copy the forward and reverse lookup zone files:
$ sudo cp db.local forward.linuxbuzz.net
$ sudo cp db.127 reverse.linuxbuzz.net
Now, run the following command to configure the forward lookup zone file.
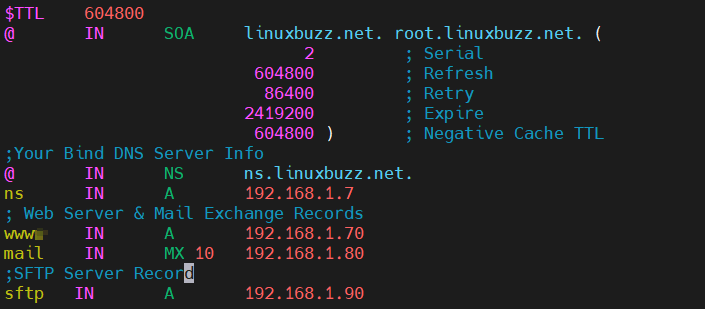
$ sudo vi forward.linuxbuzz.net
Add the following lines:
$TTL    604800
@       IN      SOA     linuxbuzz.net. root.linuxbuzz.net. (
                              2         ; Serial
                         604800         ; Refresh
                          86400         ; Retry
                        2419200         ; Expire
                         604800 )       ; Negative Cache TTL

;Your Bind DNS Server Info
@       IN      NS      ns.linuxbuzz.net.
ns      IN      A       192.168.1.7
; Web Server & Mail Exchange Records
www    IN      A       192.168.1.70
linuxbuzz.net.  IN   MX  10  mail.linuxbuzz.net.
mail    IN      A        192.168.1.80
;SFTP Server Record
sftp   IN       A       192.168.1.90
Save and exit the file.
Also, configure the reverse lookup zone file:
$ sudo vi /etc/bind/reverse.linuxbuzz.net
Add the following lines:
$TTL    604800
@       IN      SOA     linuxbuzz.net. root.linuxbuzz.net. (
                              1         ; Serial
                         604800         ; Refresh
                          86400         ; Retry
                        2419200         ; Expire
                         604800 )       ; Negative Cache TTL

;Your Bind DNS Server Info
@       IN      NS      ns.linuxbuzz.net.
ns      IN      A       192.168.1.7
;Your Reverse Lookup Record for DNS
7       IN      PTR     ns.linuxbuzz.net.
;Reverse Lookup Records for Servers
70      IN     PTR      www.linuxbuzz.net.
80      IN     PTR      mail.linuxbuzz.net.
90      IN     PTR      sftp.linuxbuzz.net.
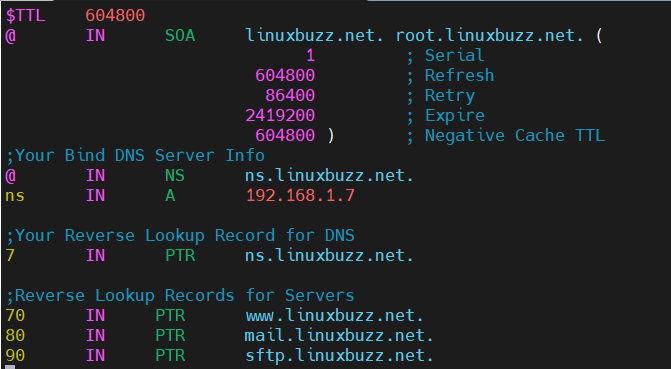
Once you are done, save the changes and exit the file. Now, restart the Bind DNS service to implement the above changes.
$ sudo systemctl restart named
To check the forward zone file for syntax errors, run:
$ sudo named-checkzone linuxbuzz.net forward.linuxbuzz.net

To also check the reverse lookup zone file for syntax errors, run:
$ sudo named-checkzone linuxbuzz.net reverse.linuxbuzz.net

The output above indicates that both zone files are correctly configured in terms of syntax.
Note: If you have firewall enabled on your Bind DNS server, run the following command to allow bind port (53).
$ sudo ufw allow 53
4) Test Bind DNS Server
To test the BIND 9 DNS server, we will use another Linux system and change its DNS to point out to the DNS server we’ve configured. To accomplish this, open the ‘/etc/resol.conf’ file:
$ sudo vi /etc/resolv.conf
Add the following lines:
search linuxbuzz.net
nameserver 192.168.1.7
save the file and exit. We now have our client ready, with DNS pointing to the Bind DNS server we’ve set up. Now, you can use the dig or nslookup command to get the DNS records. run the following command from your terminal:
$ dig ns.linuxbuzz.net
This command provides you with DNS-related information regarding your configured domain.
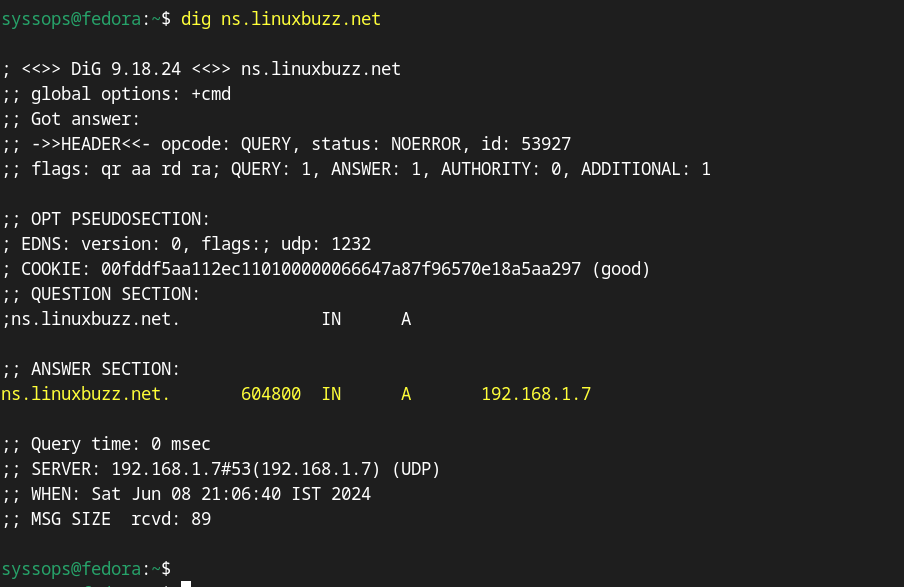
You can also perform the reverse lookup query by running the dig command against the IP address of the DNS server, as shown below:
$ dig -x 192.168.1.7
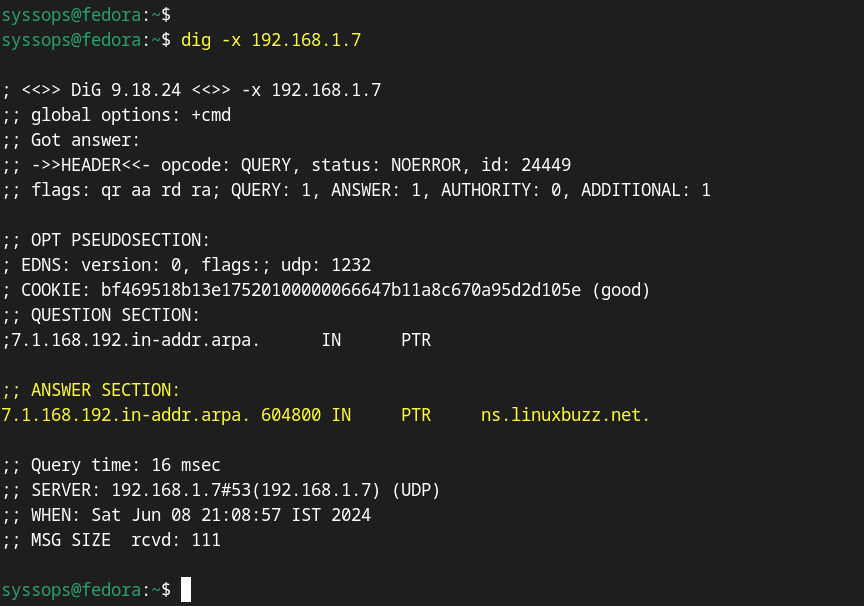
Alternatively, you can use nslookup command to check DNS records, as shown below:
$ nslookup www.linuxbuzz.net
$ nslookup mail.linuxbuzz.net
$ nslookup sftp.linuxbuzz.net
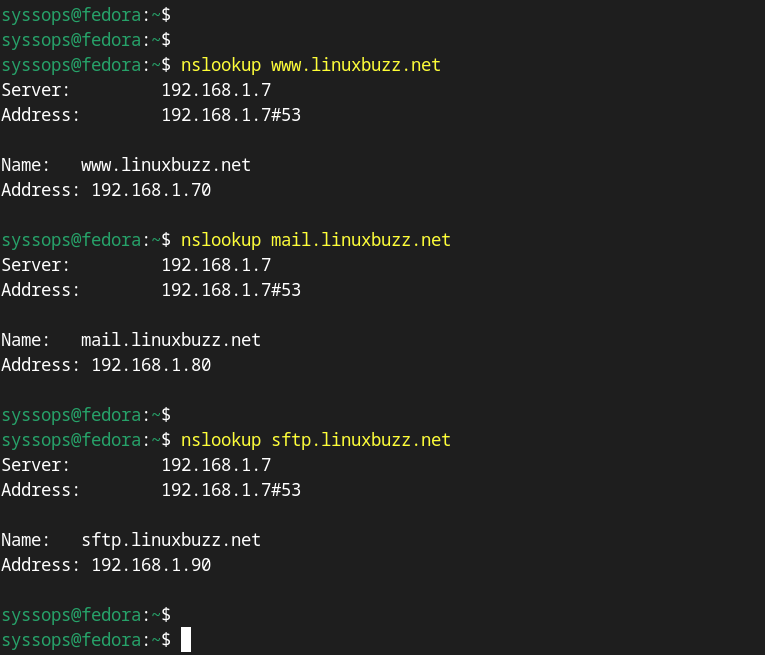
Conclusion
That’s it. You can now go ahead and set up the Bind DNS server in your environment. Feel free to ask any queries or feedback regarding this setup in the comment section below.
Also Read: How to Setup DHCP Server With Dnsmasq on Debian 12